Smartphones have become powerful tools for photography, but raw photos often need refinement to look truly professional. Knowing how to edit photos to look professional on a phone allows content creators, small business owners, and social media users to produce high-quality visuals without expensive software. This guide explains practical editing techniques you can apply directly on your phone to elevate your photos.
1. Choose the Right Mobile Photo Editing Apps
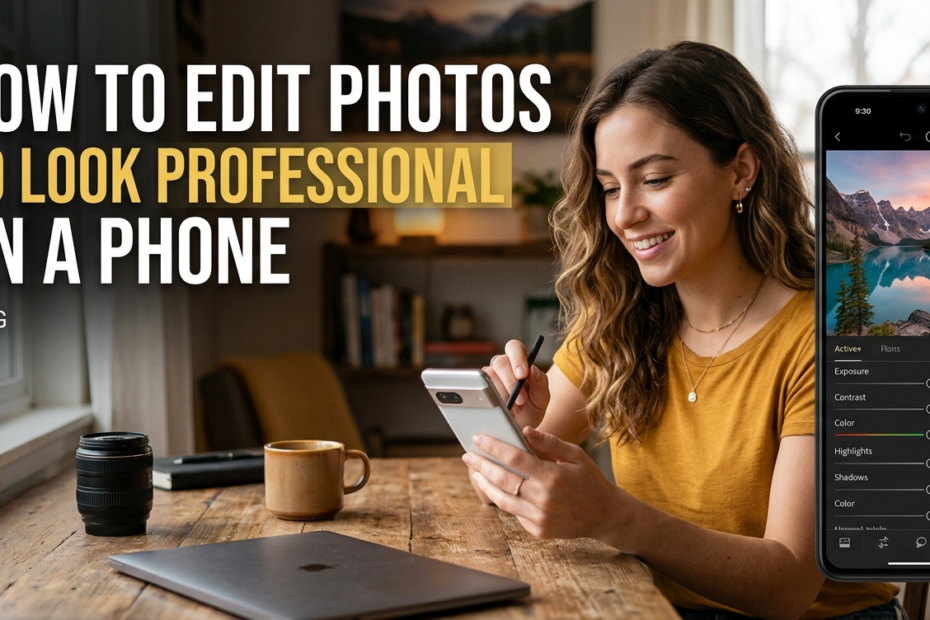
To achieve professional results, start with reliable editing apps. Mobile apps now offer advanced tools once limited to desktop software.
Popular options include:
-
Lightroom Mobile for precise color and exposure control
-
Snapseed for selective edits and detail enhancement
-
VSCO for natural-looking filters and tone consistency
Using professional-grade apps is the foundation of learning how to edit photos to look professional on a phone.
2. Adjust Exposure and Lighting First
Lighting corrections should always come before filters. Increase or reduce:
-
Brightness to balance the image
-
Contrast to add depth
-
Highlights and shadows to recover details
Proper lighting adjustments instantly make a photo look cleaner and more polished.
3. Fine-Tune Colors for a Natural Look
Professional photos avoid overly saturated colors. Instead:
-
Slightly increase vibrance instead of saturation
-
Adjust white balance to remove color casts
-
Keep skin tones realistic and consistent
Color accuracy plays a major role in making photos look professionally edited on a phone.
4. Sharpen Details Without Overdoing It
Subtle sharpening improves clarity, but excessive sharpening reduces image quality. Focus on:
-
Edges and textures
-
Facial details (with moderation)
-
Avoiding noise in low-light photos
Professional editing is about refinement, not exaggeration.
5. Use Cropping and Straightening to Improve Composition
A well-edited photo follows good composition rules. Cropping helps:
-
Remove distractions
-
Center the subject properly
-
Apply the rule of thirds
Straightening images also adds a professional finish that many beginners overlook.
6. Apply Filters Sparingly
Filters should enhance, not dominate, an image. Reduce filter intensity and customize settings manually. Consistent editing style helps build a recognizable visual brand, especially on social media platforms.
7. Export Settings Matter
Always export photos in high resolution. Avoid excessive compression, especially if the image will be used for websites, blogs, or Instagram posts. Exporting correctly preserves the professional look of your edits.
Conclusion
Mastering how to edit photos to look professional on a phone does not require expensive equipment or advanced skills. With the right apps, thoughtful adjustments, and consistent practice, anyone can produce high-quality images directly from a smartphone. Start applying these techniques today and watch your photo quality improve significantly.
Frequently Asked Questions
How do I make my phone photos look professional?
Making your phone photos look professional is less about having expensive gear and more about understanding a few core principles of photography. The first and most important factor is lighting. Natural light is your best friend.
Try to shoot during the early morning or late afternoon when the light is soft and warm, often referred to as “golden hour.” Avoid harsh midday sunlight because it creates strong shadows and can wash out details. If you’re indoors, position your subject near a window and avoid mixing different light sources, as this can distort colors.
Composition plays a huge role in elevating your images. One simple technique is the rule of thirds. Turn on your phone’s grid lines and place your subject slightly off-center along those lines or intersections.
This creates a more balanced and visually appealing image. Also, pay attention to your background. A cluttered or distracting background can ruin an otherwise great shot. Choose clean, simple backdrops or adjust your angle to remove unwanted elements.
Stability is another key factor. Blurry photos instantly look unprofessional. Hold your phone steady with both hands or use a tripod if possible. You can also use your phone’s timer or a remote shutter to avoid camera shake. Clean your camera lens regularly, as even small smudges can reduce sharpness and clarity.
Focus and exposure control can dramatically improve your results. Tap on your subject to ensure it’s in focus, and adjust the exposure slider if your phone allows it. Slightly lowering exposure can help preserve highlights and create a more cinematic look. Avoid using digital zoom, as it reduces image quality. Instead, move closer to your subject.
Finally, think about storytelling. Professional photos often evoke emotion or tell a story. Instead of just snapping random shots, consider what you want the viewer to feel.
Experiment with angles, perspectives, and framing to create more dynamic and engaging images. With consistent practice and attention to detail, your phone photography can reach a professional level without needing expensive equipment.
How do I edit my pictures to look professional?
Editing is where your photos truly come to life. Even the best photographers rely on editing to refine their images. The first step is to choose a reliable editing app such as Lightroom Mobile, Snapseed, or VSCO. These tools offer powerful features that can transform your photos while maintaining a natural look.
Start with basic adjustments. Exposure, contrast, highlights, and shadows are the foundation of any good edit. Slightly increase exposure if your image is too dark, but avoid overexposing. Reduce highlights to recover bright areas and lift shadows to reveal hidden details. Adjust contrast carefully to add depth without making the image look harsh.
White balance is crucial for achieving accurate colors. If your photo looks too warm (yellow/orange) or too cool (blue), adjust the temperature slider until it appears natural. Tint can also help correct color imbalances. Getting the colors right is one of the fastest ways to make your photos look more professional.
Next, work on clarity and sharpness. Increasing clarity adds texture and detail, but overdoing it can make the image look unnatural. Sharpening should be subtle, just enough to enhance details without introducing noise. Speaking of noise, use the noise reduction tool if your image was taken in low light.
Color grading is what gives your photo a unique style. You can adjust saturation and vibrance to enhance colors, but be careful not to oversaturate. A professional look often leans toward slightly muted, balanced tones. You can also use presets as a starting point, but always tweak them to fit your specific image.
Cropping and straightening are often overlooked but essential. Align your horizon and remove unnecessary elements from the frame. This helps improve composition and focus attention on your subject.
Finally, consistency is key. If you’re editing multiple photos, try to maintain a similar style across all of them. This creates a cohesive and polished look, especially if you’re posting on social media or building a portfolio. With practice, editing becomes intuitive, and your photos will consistently look refined and professional.
How to be 100% photogenic in every picture?
Being photogenic is not about having perfect features; it’s about understanding how to present yourself in front of the camera. The first step is confidence. When you feel comfortable, it naturally reflects in your photos.
Practice in front of a mirror to discover your best angles and expressions. Everyone has a side or angle that looks more flattering, and knowing yours gives you an advantage.
Lighting plays a major role in how you appear. Always position yourself facing the light source. This illuminates your face evenly and reduces shadows. Avoid overhead lighting, as it can create unflattering shadows under your eyes and chin. Soft, natural light is the most flattering option.
Your posture can completely change how you look in a photo. Stand or sit up straight, relax your shoulders, and slightly elongate your neck. Avoid facing the camera directly; instead, turn your body slightly to the side and angle your face back toward the lens. This creates a more dynamic and slimming effect.
Facial expressions are another key factor. A natural smile often looks better than a forced one. Try to think of something that genuinely makes you happy to create an authentic expression. Relax your face and avoid tensing your jaw. Small adjustments, like slightly raising your chin or lowering it depending on the angle, can make a big difference.
Movement can also help. Instead of staying stiff, try subtle actions like walking, turning, or adjusting your hair. These movements create candid, natural-looking photos that often appear more professional and engaging.
Clothing and styling matter too. Wear colors that complement your skin tone and avoid overly busy patterns that can distract from your face. Simple, well-fitted outfits usually photograph better.
Finally, practice is essential. The more photos you take, the more you understand what works for you. Review your pictures and learn from them. Being photogenic is a skill that improves over time, and with consistency, you can look great in nearly every photo you take.
How to edit photos on Android to look professionally free?
Editing photos professionally on Android without spending money is completely possible thanks to several powerful free apps. Start by downloading apps like Snapseed, Lightroom Mobile (free version), or PicsArt. These apps offer advanced tools that rival desktop software.
Begin your editing process with basic corrections. Adjust brightness, contrast, highlights, and shadows to balance your image. Lowering highlights helps recover bright areas, while increasing shadows reveals hidden details. This step alone can significantly improve your photo’s quality.
Use the white balance tool to correct color tones. If your image looks too warm or cool, adjust the temperature slider until it looks natural. This ensures your colors are accurate and pleasing to the eye.
Next, refine details using tools like structure, clarity, and sharpness. These enhance textures and make your image look crisp. However, moderation is key. Over-editing can make your photo look artificial.
One of the best free features on Android apps is selective editing. This allows you to adjust specific parts of your image rather than the whole photo. For example, you can brighten a subject’s face without affecting the background. This adds a professional touch to your edits.
Filters and presets can be useful, but avoid relying on them completely. Use them as a base and then customize the settings to suit your image. This helps maintain originality and avoids a generic look.
Cropping and perspective correction are also important. Straighten your image and remove unnecessary elements to improve composition. Many apps also allow you to fix distortions, which can be helpful for architectural or wide-angle shots.
Finally, export your image in high quality. Avoid compressing it too much, as this reduces sharpness. With consistent practice and attention to detail, you can achieve professional-level edits on Android without spending any money.
How to make Android pictures look better?
Improving the quality of pictures taken on an Android phone starts with understanding your camera settings. Many Android devices come with advanced features like HDR, portrait mode, and manual controls. Use HDR when shooting high-contrast scenes, as it balances bright and dark areas for a more detailed image.
Clean your camera lens regularly. This simple habit can dramatically improve image clarity. Smudges and dust can make photos look blurry and dull, even if your camera is high quality.
Lighting remains the most critical factor. Always aim to shoot in good lighting conditions. Natural light is ideal, but if you’re shooting at night, use available light sources creatively instead of relying solely on flash. Flash often creates harsh and unnatural results.
Experiment with camera angles and perspectives. Instead of taking all your photos at eye level, try shooting from above, below, or at different angles. This adds variety and makes your photos more interesting.
Use the grid feature to improve composition. Align your subject according to the rule of thirds and ensure your horizon is straight. Small adjustments in framing can make a big difference in how professional your photo looks.
Avoid using digital zoom. It reduces image quality by cropping the image. Instead, move closer to your subject whenever possible. If your phone has multiple lenses, switch to the appropriate one for better results.
Editing is the final step to enhance your photos. Even a quick edit adjusting brightness, contrast, and color can elevate your image significantly. Use free apps to fine-tune your photos and give them a polished look.
Lastly, practice consistently. The more you take photos and experiment with different techniques, the better your results will become. Over time, you’ll develop an eye for detail and composition, allowing you to capture high-quality images effortlessly with your Android device.
Why is 12MP better than 48MP?
At first glance, it seems obvious that a 48-megapixel camera should outperform a 12-megapixel one. More megapixels mean more detail, right? While that is partially true, megapixels are only one piece of the puzzle.
In real-world photography, especially on smartphones, a 12MP camera can often produce better-looking images than a 48MP camera due to several important factors.
One of the biggest reasons is pixel size. A 12MP sensor typically has larger individual pixels compared to a 48MP sensor of the same physical size. Larger pixels can capture more light, which leads to better image quality, especially in low-light conditions.
This means less noise, better color accuracy, and improved dynamic range. On the other hand, a 48MP sensor packs more pixels into the same space, making each pixel smaller and less capable of gathering light efficiently.
Another key factor is pixel binning. Many 48MP smartphone cameras don’t actually produce true 48MP images by default. Instead, they combine multiple pixels into one larger “super pixel” to create a 12MP image. This process improves brightness and detail while reducing noise. In essence, the camera is relying on a 12MP output because it is more practical and visually appealing in most situations.
Lens quality and image processing also matter more than megapixel count. A high-quality 12MP camera with excellent software optimization can outperform a poorly optimized 48MP camera. Smartphone manufacturers invest heavily in computational photography—things like HDR, AI enhancements, and noise reduction—which often have a bigger impact than resolution alone.
File size and usability are also considerations. 48MP images are significantly larger, taking up more storage and requiring more processing power. For everyday use, sharing, and social media, 12MP images are more than sufficient and often look sharper because they are optimized for screens.
In summary, while 48MP cameras have advantages in specific scenarios like cropping or printing large images, a 12MP camera often delivers better overall performance, especially in low light and everyday photography. It’s a great example of how quality matters more than just numbers.
How do I stop looking bad in pictures?
Feeling like you look bad in photos is incredibly common, and it usually has more to do with technique than appearance. The good news is that there are simple adjustments you can make to drastically improve how you look in pictures.
Lighting is the first thing to fix. Poor lighting can create harsh shadows, emphasize imperfections, and distort your features. Always face the light source, preferably natural light. Soft lighting smooths your skin and highlights your best features, while overhead or dim lighting can make you look tired or uneven.
Angles make a huge difference. Avoid facing the camera straight on. Instead, turn your body slightly to the side and tilt your face just a bit toward the camera. This adds depth and makes your features appear more defined. Also, avoid holding the camera too low, as it can create unflattering angles. Slightly above eye level is usually more flattering.
Your expression matters more than you think. A forced smile often looks unnatural. Try to relax your face and think of something that genuinely makes you happy. A subtle, natural smile is usually more attractive than a big, stiff grin. Practicing in front of a mirror can help you discover what works best for you.
Posture is another overlooked factor. Slouching can make you look less confident and less flattering. Stand or sit up straight, pull your shoulders back slightly, and elongate your neck. Good posture instantly improves your appearance in photos.
Clothing and grooming also play a role. Wear colors that complement your skin tone and avoid overly busy patterns. Simple, well-fitted outfits tend to photograph better. Pay attention to small details like hair and accessories.
Finally, remember that photos are just a single frozen moment. They don’t capture your personality, movement, or energy. Take multiple shots instead of relying on just one, and don’t be too hard on yourself. With practice and awareness, you’ll start to notice a big improvement in how you look in pictures.
Why is my face not photogenic?
The idea of being “not photogenic” is largely a myth. What people often interpret as not being photogenic usually comes down to unfamiliarity with how cameras capture images rather than any flaw in their appearance.
One major reason is that we are used to seeing ourselves in the mirror, which shows a reversed version of our face. Cameras, however, show how others see us. This difference can make your face look unfamiliar or “off,” even though it looks perfectly normal to other people.
Lighting and angles also play a significant role. A face can look completely different depending on how light falls on it. Harsh lighting can create shadows that exaggerate features, while soft lighting can make your face look smoother and more balanced. Similarly, certain angles may not flatter your natural features, while others enhance them.
Lens distortion is another factor. Smartphone cameras, especially front-facing ones, can slightly distort your face, particularly if the camera is too close. This can make features like your nose or forehead appear larger than they actually are. Using the back camera or stepping slightly farther away can help reduce this effect.
Facial tension can also affect how you look. When you’re aware of the camera, you might unconsciously tense your face, leading to unnatural expressions. Relaxing your face and taking candid shots often produces better results.
It’s also important to understand that cameras flatten three-dimensional features into a two-dimensional image. This can reduce depth and make your face appear less dynamic compared to how it looks in real life.
The truth is, everyone is photogenic with the right conditions. It’s about learning your best angles, understanding lighting, and becoming comfortable in front of the camera. With practice, you’ll find that your photos start to reflect how you actually look—and feel—much more accurately.
What are the 7 posing points?
The “7 posing points” are a set of simple techniques used to create flattering and natural-looking poses in photos. These points help improve posture, body positioning, and overall appearance, making your photos look more professional and appealing.
The first point is posture. Always stand or sit up straight. Good posture makes you look confident and improves the overall structure of your body in the photo. Slouching, on the other hand, can make you appear less energetic and less flattering.
The second point is chin position. Slightly extend your chin forward and then lower it a bit. This helps define your jawline and avoids the appearance of a double chin. It’s a subtle adjustment but makes a big difference.
The third point is shoulder angle. Instead of facing the camera directly, turn your shoulders slightly to the side. This creates a more dynamic and slimming effect.
The fourth point is arm placement. Avoid pressing your arms tightly against your body, as this can make them look larger. Keep a small gap between your arms and torso to create better shape.
The fifth point is hand positioning. Hands should look relaxed and natural. Avoid stiff or clenched fingers. You can place your hands in your pockets, lightly touch your face, or hold an object to create a more natural look.
The sixth point is weight distribution. Shift your weight onto one leg instead of standing evenly on both. This creates a more relaxed and natural stance.
The seventh point is facial expression. Keep your expression natural and relaxed. A genuine smile or a calm, confident look usually works best.
When you combine these seven points, your poses will look more intentional and polished without appearing forced. With practice, these techniques become second nature and can significantly improve your photos.
Does my camera show my true face?
A camera does not perfectly show your “true” face, but it doesn’t completely distort it either. What you see in photos is a representation influenced by several technical factors, which can make you look slightly different from how you appear in real life.
One major factor is lens distortion. Smartphone cameras, especially wide-angle lenses, can subtly alter facial proportions. If the camera is too close, it can make certain features like your nose appear larger. This is why selfies sometimes look different from photos taken by someone else from a distance.
Lighting also has a huge impact. Different lighting conditions can change how your features appear by creating shadows or highlights. Good lighting can enhance your appearance, while poor lighting can make you look less flattering.
Another important factor is perspective. In real life, people see you in motion and from multiple angles. A photo captures just one angle at one moment, which may not represent how you usually look. This is why you might feel that a picture doesn’t “look like you.”
Mirrors also play a role in perception. You’re used to seeing a flipped version of your face in the mirror, while photos show the non-flipped version. This difference can make photos feel unfamiliar, even though they are accurate to how others see you.
Camera settings and image processing can also affect the final result. Things like HDR, filters, and sharpness adjustments can subtly change your appearance.
In reality, no single photo can fully capture your true face. Your real appearance is a combination of movement, expressions, and personality—things that a still image can’t completely represent. So while cameras provide a close approximation, they are not a perfect reflection of how you truly look in real life.
How to take pictures like a pro with Android?
Taking professional-looking photos with an Android phone is all about mastering technique rather than relying on expensive equipment. The first thing to focus on is lighting. Good lighting can instantly elevate your photos.
Natural light is ideal, especially during early morning or late afternoon when the light is soft and flattering. Avoid harsh sunlight directly above you, as it creates strong shadows and uneven tones.
Next is composition. Use your phone’s grid feature to apply the rule of thirds. Place your subject slightly off-center rather than directly in the middle. This makes your photos more visually appealing and balanced. Also, pay attention to your background. A clean, uncluttered background helps your subject stand out and gives your photo a more professional feel.
Stability is crucial. Shaky hands lead to blurry images, which instantly look unprofessional. Hold your phone with both hands or use a tripod if possible. You can also use the timer feature to reduce movement when pressing the shutter button.
Learn to control focus and exposure. Tap on your subject to focus, and adjust the brightness slider if your phone allows it. Slightly lowering exposure can help retain details and give your photo a more cinematic look. Avoid using digital zoom; instead, physically move closer to your subject.
Experiment with angles. Don’t just shoot from eye level. Try different perspectives—shoot from above, below, or from the side to add creativity and depth. Professional photographers often explore multiple angles before settling on the best shot.
Finally, always edit your photos. Even a simple adjustment to brightness, contrast, and color can make a big difference. With practice and consistency, your Android photos can easily look like they were taken by a professional.
What phone settings improve photos?
Optimizing your phone’s camera settings can significantly improve your photo quality. One of the most important settings is HDR (High Dynamic Range). Turning on HDR helps balance bright and dark areas in your image, making it especially useful for landscapes or scenes with strong contrast.
Resolution settings also matter. Always set your camera to the highest quality available, but remember that higher resolution uses more storage. For everyday use, a balanced setting works best, but for important shots, go full resolution.
Grid lines are another helpful feature. Enabling the grid allows you to compose your shots better using the rule of thirds. This small adjustment can greatly improve how your photos look.
If your phone has a “Pro” or “Manual” mode, take advantage of it. You can control ISO, shutter speed, and white balance. Lower ISO reduces noise, while adjusting white balance ensures accurate colors. These controls give you more creative freedom and better results.
Turn off beauty filters or excessive AI enhancements if you want a natural, professional look. While these features can be fun, they often make photos look artificial.
Use portrait mode wisely. It can create a blurred background (bokeh effect) that makes your subject stand out, but it works best in good lighting and with clear subject separation.
Finally, ensure your lens is clean. This isn’t a setting, but it’s just as important. A dirty lens can reduce sharpness and clarity, no matter how good your settings are.
What is the best time of day for photos?
The best time of day for photos is during the “golden hour,” which occurs shortly after sunrise and just before sunset. During this time, the sunlight is soft, warm, and diffused, creating flattering tones and long, gentle shadows. This type of lighting enhances skin tones and adds depth to your images.
Morning golden hour is great for calm, fresh-looking photos, while evening golden hour offers warmer, more dramatic tones. Both are ideal for portraits, landscapes, and almost any type of photography.
Another good time is the “blue hour,” which happens just before sunrise or after sunset. The sky takes on a deep blue tone, creating a moody and cinematic atmosphere. This is perfect for cityscapes and creative shots.
Midday, when the sun is directly overhead, is usually the worst time for photos. The light is harsh and creates strong shadows under the eyes and nose, which can be unflattering. If you must shoot during this time, look for shade or use indirect light.
Indoor photography works best when you use natural light from windows. Position your subject facing the light source to achieve soft, even illumination.
Understanding and using the right time of day can dramatically improve your photos without any editing.
Why do I look good in selfies but bad in pictures?
This is a very common experience, and it mostly comes down to camera differences and perception. Selfies are usually taken with the front camera at a close distance, which creates a familiar look because you often see yourself that way. However, this can slightly distort your features, sometimes in a way you’ve grown used to liking.
In contrast, photos taken by others often use the back camera from a farther distance. These images show your face more accurately, but they may look unfamiliar to you, which can make you feel like you look worse.
Another factor is control. When taking selfies, you choose your angle, lighting, and expression. You can take multiple shots until you find one you like. In regular photos, you have less control, and the shot might capture an awkward moment or expression.
Lighting also plays a big role. Selfies are often taken in good lighting conditions, while other photos might not be as well-lit. Poor lighting can create shadows and highlight imperfections.
Lens differences matter too. Front cameras are often wider, which can slightly change proportions. Back cameras usually provide more realistic detail, which might feel less flattering but is more accurate.
The key takeaway is that neither version is “wrong.” They’re just different representations. Learning your best angles and improving lighting in regular photos can help bridge the gap.
How do I see how I actually look?
Seeing how you truly look is tricky because there isn’t a single perfect representation. Mirrors, photos, and videos all show slightly different versions of you.
Mirrors show a reversed image of your face—the version you’re most familiar with. Photos, however, show your face as others see it, which can feel unfamiliar. This difference alone can make you think you look different than you actually do.
One of the best ways to get a more accurate sense of your appearance is through video. Record yourself and watch it back. Video captures movement, expressions, and different angles, giving a more realistic representation than a single photo.
Another method is using the back camera at a natural distance. Ask someone to take photos of you in good lighting and from different angles. This reduces lens distortion and gives a more balanced view.
You can also use the “flip” feature on photos to see the non-mirrored version of yourself. While it may look strange at first, this is closer to how others see you.
It’s important to remember that your real appearance is not just a static image. People see you in motion, with expressions, personality, and energy. These elements can’t be fully captured in a single photo.
Ultimately, how you look in real life is a combination of many factors, and no single image can define it. Becoming comfortable with different representations of yourself will help you feel more confident and realistic about your appearance.